How to Print PowerPoint Slides Back-to-Back (Double-Sided Printing Guide)
In professional, academic, and training environments, PowerPoint presentations are often printed as handouts, reports, or reference materials. Double-sided (back-to-back) printing—also known as duplex printing—not only reduces paper usage but also improves document organization and presentation quality. This guide explains how to print PowerPoint slides back-to-back across different systems and printer capabilities.
Understanding Double-Sided Printing in PowerPoint
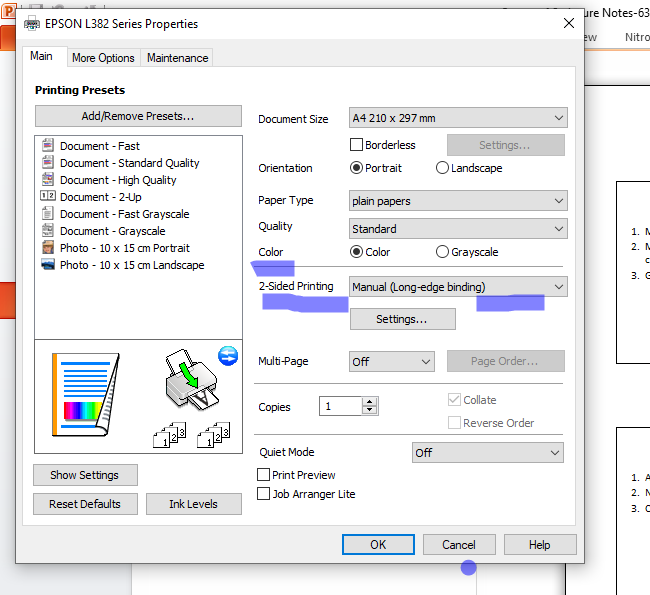
Double-sided printing allows content to be printed on both sides of a single sheet of paper. PowerPoint itself does not manage duplex printing directly; instead, it relies on printer settings. Therefore, understanding printer options such as flip on long edge and flip on short edge is essential.
- Flip on Long Edge: Best for portrait orientation and standard document reading.
- Flip on Short Edge: Ideal for landscape slides and booklet-style handouts.
Standard Method (Windows and Most Duplex Printers)
Most modern printers support automatic duplex printing. Follow these steps:
-
Open your PowerPoint presentation.
-
Click File > Print or press Ctrl + P.
-
Under Printer, select your desired printer.
-
In the Settings section:
- Enable Print on Both Sides.
- Choose either Flip on long edge or Flip on short edge, depending on layout.
-
Select a slide layout:
- Full Page Slides for presentations
- Notes Pages for speaker notes
- 2–6 Slides per Page for handouts
-
Click Print.
Printing Without Automatic Duplex Support
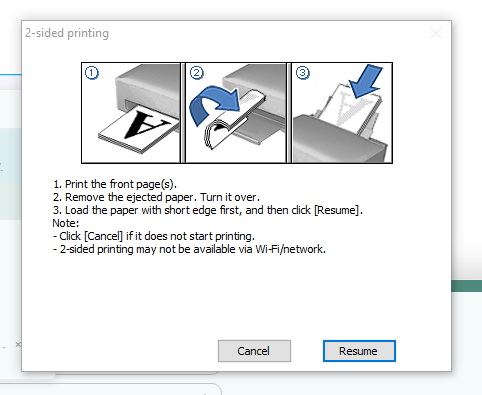
If your printer does not support automatic double-sided printing, manual duplex printing is required.
Manual Duplex Steps
- In the Print menu, select Print Odd Pages.
- Print the pages.
- Reinsert the printed stack into the paper tray (orientation varies by printer model).
- Return to Print Settings and select Print Even Pages.
- Print again to complete the document.
This method requires attention to paper orientation but works reliably on single-sided printers.
Printing on macOS Systems
Mac users have additional control through system print dialogs:
- Go to File > Print.
- Open Copies & Pages.
- Navigate to Layout or Finishing.
- Enable Two-Sided Printing.
- Select Long-edge or Short-edge binding.
- Proceed to print.
Optimizing Handouts and Booklets
For training manuals, academic handouts, or booklets, exporting to PDF provides better layout control.
Recommended Workflow
- In PowerPoint, select File > Save As > PDF.
- Open the PDF using Adobe Acrobat Reader.
- Go to Print > Booklet.
- Adjust margins, page scaling, and binding options.
- Print with precise alignment and pagination.
This method is especially useful when printing multiple slides per page or producing folded booklets.
Best Practices for Professional Results
- Always print one test page before large print runs.
- Use landscape orientation with short-edge flipping for slide handouts.
- Choose higher paper quality for client-facing or instructional materials.
- Save final versions as PDF for consistency across devices.
Conclusion
Printing PowerPoint slides back-to-back is a practical and professional approach to document preparation. Whether using automatic duplex printers, manual flipping, or PDF-based workflows, understanding the correct settings ensures clean, readable, and efficient output. By applying these techniques, users can produce high-quality handouts while minimizing paper usage and printing errors.