How to Purge a User Mail Queue in WHM Using SSH (Exim)
Introduction
On cPanel/WHM servers, a clogged mail queue is a common operational issue—often caused by spam outbreaks, misconfigured scripts, or temporary delivery failures. While clearing the entire queue is sometimes necessary, best practice dictates targeted cleanup, especially when only one account is affected.
This guide explains how to safely purge the mail queue for a specific user (e.g., nestict) using SSH on a WHM server running Exim.
Understanding the Mail Queue in WHM
WHM servers typically rely on Exim as the Mail Transfer Agent (MTA). The mail queue temporarily stores outbound and inbound emails that could not be delivered immediately due to:
- DNS resolution failures
- Remote mail server throttling
- Spam filtering blocks
- Compromised PHP or CMS scripts
Purging only the affected user’s messages minimizes service disruption to other accounts.
Prerequisites
Before proceeding, ensure:
- You have root SSH access
- The server is running Exim
- You know the affected cPanel username
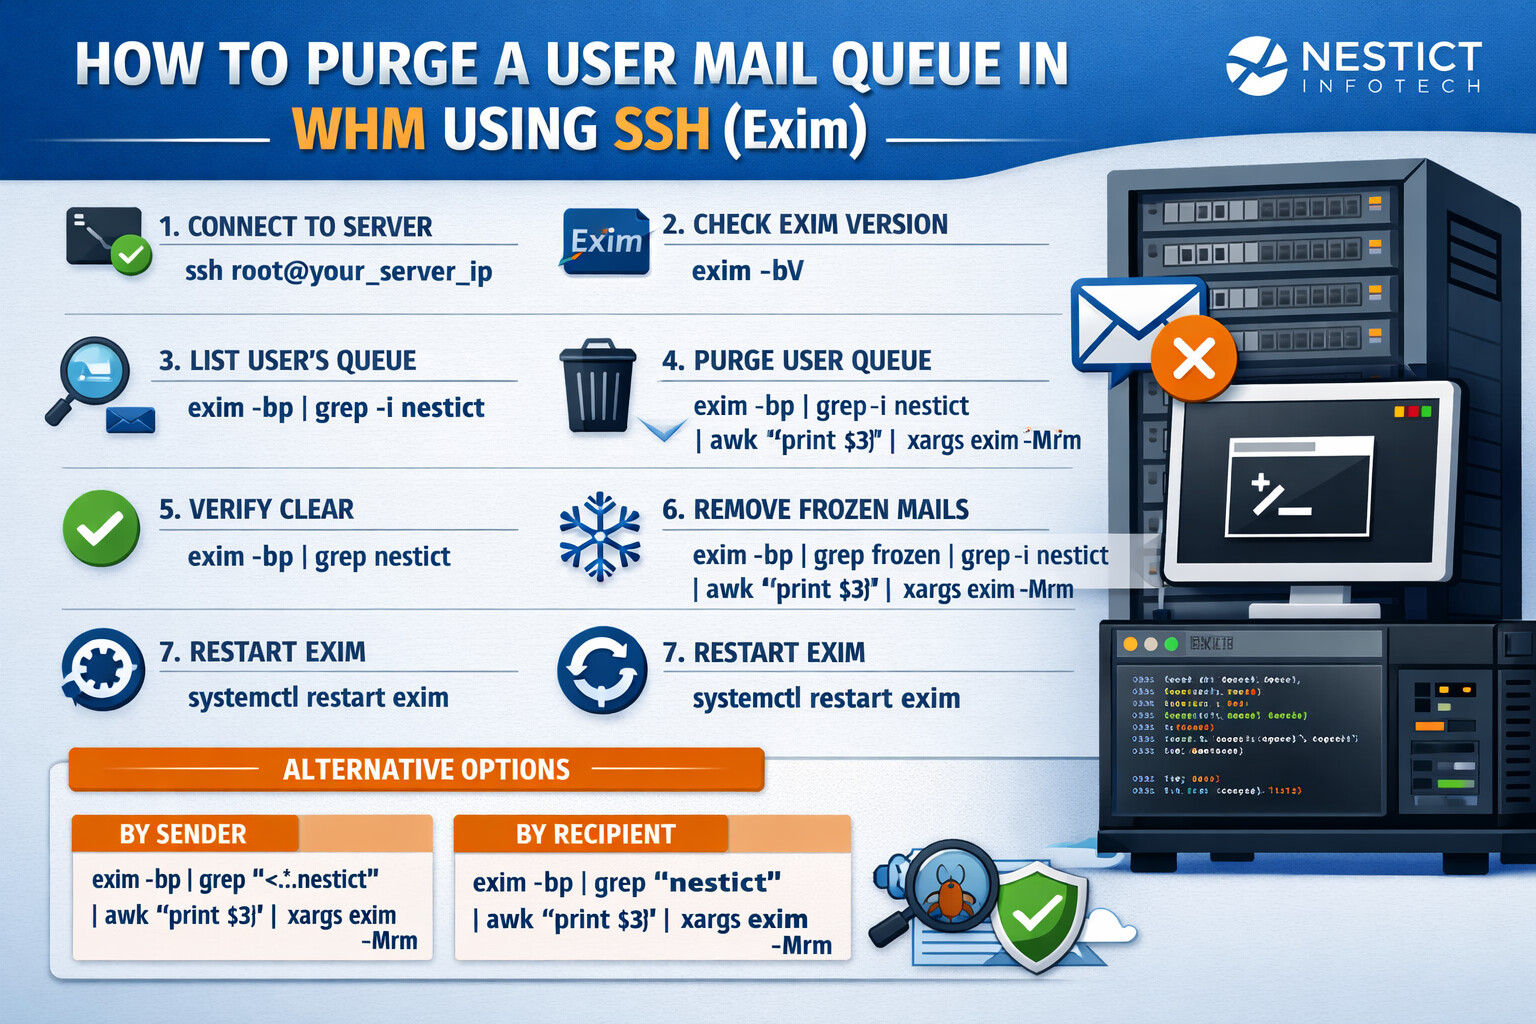
Step 1: Connect to the Server via SSH
ssh root@your_server_ip
Mail queue operations require root privileges.
Step 2: Confirm Exim Is Installed
exim -bV
If Exim responds with version information, continue.
Step 3: Inspect the Mail Queue for the User
Before deleting anything, review queued emails related to the user:
exim -bp | grep -i nestict
This command displays all queued messages where the sender or recipient contains nestict.
Step 4: Purge the Mail Queue for the User
Recommended Method (Sender + Recipient Match)
exim -bp | grep -i nestict | awk '{print $3}' | xargs exim -Mrm
What this does:
- Lists all queued messages
- Filters messages related to
nestict - Extracts message IDs
- Removes them safely from the queue
Alternative Scenarios
Delete Only Messages Sent From the User
exim -bp | grep '<.*nestict' | awk '{print $3}' | xargs exim -Mrm
Delete Only Messages Sent To the User
exim -bp | grep 'nestict' | awk '{print $3}' | xargs exim -Mrm
Step 5: Verify the Cleanup
exim -bp | grep nestict
If no output appears, the queue for that user has been successfully cleared.
Step 6: Remove Frozen Messages (If Any)
Frozen emails will never retry delivery unless manually handled.
exim -bp | grep frozen | grep -i nestict | awk '{print $3}' | xargs exim -Mrm
Step 7: Restart Exim (Optional but Recommended)
systemctl restart exim
or:
service exim restart
This ensures queue state consistency.
Common Causes of Recurring Queue Issues
If the problem reappears, investigate:
- Compromised CMS installations (WordPress, Joomla, Drupal)
- Malicious PHP mail scripts
- Weak email authentication (SPF, DKIM, DMARC)
- Absence of WHM rate limits
Log files to review:
/var/log/exim_mainlog
/var/log/exim_rejectlog
Best Practices for WHM Administrators
- Avoid clearing the entire mail queue unless necessary
- Monitor outbound mail rates per account
- Enable WHM SMTP restrictions
- Schedule periodic mail queue audits
- Use CSF + ModSecurity to block exploit vectors
Conclusion
Purging the mail queue for a single user in WHM is a precise and safe operation when performed via SSH using Exim tools. This approach preserves overall mail service stability while resolving user-specific issues efficiently.
For managed WHM services, email security hardening, or server audits, NESTICT INFOTECH provides professional Linux and hosting infrastructure support.